In reality, I didn’t know Anisha before I started applying. The message I sent to her went like this:
=IF(F33 =”/”, “”,CONCATENATE(“Hello “,INDEX(SPLIT(F33,” “),0,1),”. I am reaching out to you, because I am currently concluding my AIESEC career. After 2 years in IT on AIESEC International, I was looking for a Data / Tech / Product role in “,D33,” in a Unicorn. Since you work in “,B33,” I wanted to ask you about the company!)”))
Which read like this:
Hello Anisha. I am reaching out to you, because I am currently concluding my AIESEC career. After 2 years in IT on AIESEC International, I was looking for a Data / Tech / Product role in Kuala Lumpur in a Unicorn. Since you work in Fave I wanted to ask you about the company”
What does this mean? I sent over a hundred of these messages to various people using a simple application tracker that automated part of the job to me. Anisha was just another entry in my spreadsheet (I am so sorry you have to learn it that way, Anisha 😅).
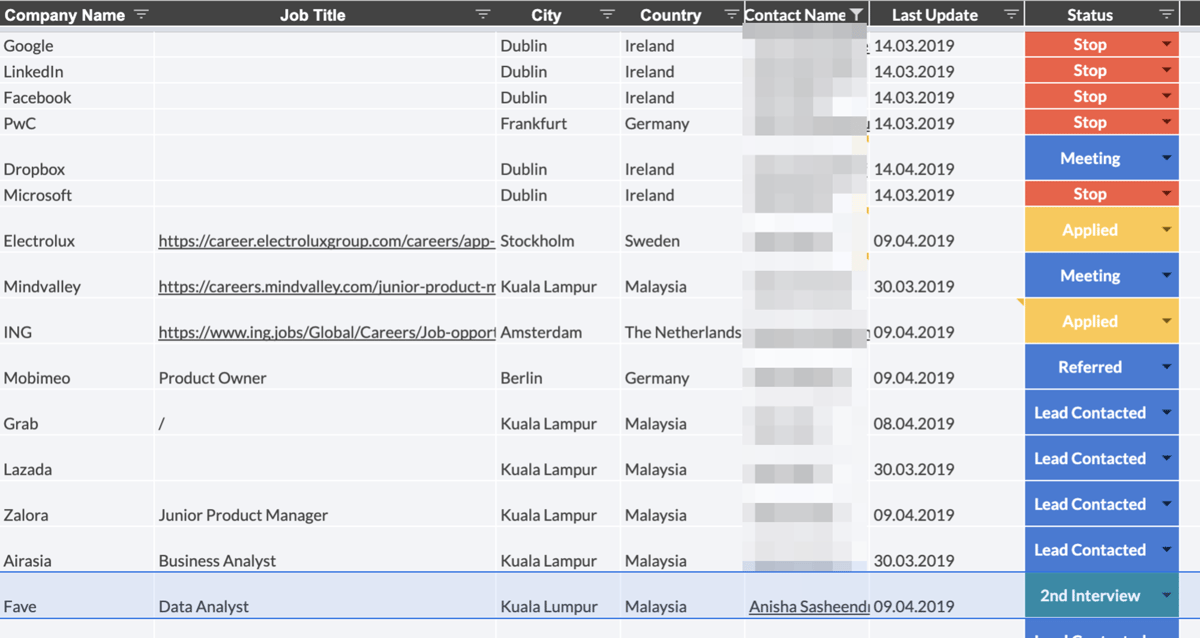
Scroll all the way down if you’re only interested in the application tracker. Contact me if you just want the template.
What is this article about?
I am not only going to tell you about how I built an application tracker, but more importantly how to approach the whole process. How to break down the daunting task of getting a job into easy steps that can get you started right now.
For me, this was after I had been working for AIESEC full-time for 3 years. I was in a comfortable situation. I knew my exit date and when I had to have my next job lined up one year in advance (leadership roles in AIESEC are usually time-boxed for 1 year. I started my last role in September 2018 and was set to exit end of August 2019). That gives plenty of time to search and find my dream job, right?
Well, every year hundreds of leaders just like me are finishing their final year with AIESEC and are in the very same situation… and many of them start too late, despite having all the time in the world. Why is that?
Applying for a job is a daunting task, I’m sure you can relate! It seems like too big of a task. Procrastination kicks in, weeks go past and you’re still stuck at the same point.

Creating small wins rather than trying to force one big win helps you get started easily and ride a wave of success. Taken from Greg McKeown’s book Essentialism, a highly suggested read.
That is why I am going to help you break it down using a framework of easily digestible steps. This will reduce your anxiety on how to get started. We will break it down into a daily routine to build a powerful habit where you will spend only 20 minutes every other day to get your dream job. The main idea is rather than trying to force one big win, we are going to break everything down into smaller wins (I did not come up with this idea Greg McKeown did and writes about it in his book Essentialism), and once you complete the first tasks you will be motivated to continue!
Disclaimer: I cannot promise this approach will get you hired, it should, however, increase your chances.
I learned about setting 10-20 minutes aside every day to build powerful habits that stick through Robin Sharma’s Hero Genius Legend quest hosted on the Mindvalley platform.
Why I know this will work is because it did for me. While it took us 90 days, both my girlfriend and I were able to land our dream jobs in the same city, in a country neither of us ever lived in, and we had our job offers lined up four months in advance, which greatly reduced our stress around the whole topic.
So by now you’re probably waiting for me to finally tell you how to get started. I am not going to tell you to whip out your calendar and book 20 minute slots 3 times a week for the next 90 days or anything like that. While that’s something that worked greatly for me, I know that in order for people to develop powerful habits, they need to set them up to their own personal preferences and routines.
James Clear writes in his book Atomic Habits how setting intention when you want to tackle a goal will greatly increase your chances of doing so.
What’s important is that you don’t think about the task of “finding a job” but simply concern yourself with following the steps of the framework one by one.
Step 1 - Your network.
Skip this step if you already have an extensive LinkedIn network.
This is the first and most important step. Each and everyone of us has a network. These are the people you went to high school with, university buddies, former and current colleagues, teachers, bosses and other people you exchanged names with during your life. What’s important is that you have all of these people listed in one place, LinkedIn, as we’re going to make great use of the platform’s features to leverage on your personal network. In the best case, you already have that network. If not, creating it is your first task.
You should aim having around 500-1000 connections. If you struggle to reach this number, get a bit creative in whom you will connect with. In the end you will leverage on well-connected people in your network the most, so think about whom you know who is just that. Your high school friends who went to an elite uno, your rich uncle, your university president, or actually anyone else you have a loose connection to. You don’t even have to know these people, as long as there is something connecting you to them (your former job, your university, etc…).
Are your thoughts already wandering back to “finding a job”? STOP! That will only discourage you. Only think about the next task ahead of you.
Step 2 - Your mentors.
From your network you should now select around 5 key people who you trust or respect. These are people who have successfully entered a career, are knowledgable in your field or who work in HR. They will review your CV or give you guidance in future steps of the application process.
Jakob Nielsen from the Nielsen Normal Group recommends getting feedback from 5 people will usually uncover 85% of the most important problems.
Make sure to select people who are not afraid to hurt your feelings. After a few unsuccessfully applications I asked my friend and mentor Max what he thought. I felt my CV was solid. He said it was shit (he said it in nicer words). I was underselling myself, my CV was generic and it was not targeting the specific opportunities I was applying to.
Step 3 - Your CV.
I am not going to get much into this topic. There are tons of tips and resources out there that you can read to tweak your CV to perfection. I can boil down my learnings and tips to a few bullet points:
- Don’t try too hard to bypass ATS (application tracking systems) algorithms. You will find countless articles advocating for weird tips, like sending your CV in .docx format, etc… My framework is designed to prevent you from having to go through ATS altogether. Create your CV for humans instead.
- One page or two pages, either is fine, but not more (unless stated otherwise).
- Including a professional picture is preferred (unless stated otherwise).
- Tell a story about who you are or who you want to be instead of treating your CV as a laundry list of your skills and achievements.
- List only experiences relevant to your field (i.e. don’t list that you worked at McDonalds if you want to apply for a product manager job). If you want to showcase that you started working early and are a go-getter, get that point across through the story you tell on your CV.
- Absolutely no spelling or formatting issues. It should also look aesthetically pleasing. Don’t be afraid to accent your CV with some color.
- Help recruiters scan your CV easily. Add a tagline, highlight top skills. Don’t write essays or try to cramp too much information. Give enough white space to let each part of your CV breathe.
- List your top achievements in few bullet points for each job you held. Highlight the numerical impact (% growth, $ revenue generated, etc…).
Create one general base CV, later we will make tweaks depending on where you are applying.
Contact me if you’re interested in receiving my CV template.
Bonus step - Your portfolio.
At the same time that I started the process of the job search, I knew I wanted to add a portfolio. You don’t get the chance to add a list of all projects you participated in to your application, but you can sneak it in by adding a link to a personal website to your CV. Just put down a few dollars, purchase a domain and have it point to your Medium blog or anywhere else.
Again, creating a whole portfolio can also be a daunting task if you don’t have one, yet. So let’s break it down. The first step is to know what’s supposed to be in your portfolio. As a designer you are able to show off wireframes and screens. As an engineer you can show off code. In my case, as product manager, it wasn’t that straight forward. I wanted to build a repository of all the successes I’ve had.
When creating your CV, you already reflected on your achievements. Take a look at those and simply list down which you could write a longer post about. This should easily give you the first ideas.
Once you have this list, your brain will already start doing the work for you. You will find yourself thinking about the blog posts you want to be writing and your brain will already start forming sentences in your head. Just make sure to write those thoughts down! Then you just carve out some time and bring it all to (actual) paper. My experience shows writing by hand helps the creative process and you’re more easily able to form sentences while you’re writing - it just flows better. After you completed your draft, you type it up, run it through Grammarly or any other spellchecker - and you put it up. No further edits required. You’re not writing to be a writer (unless you’re applying for an actual writing job that is).
The end result could be a Medium publication (here’s mine) or a simple Wordpress website (here’s mine).
Step 4 - Your tracking system.
Scroll all the way down if you’re only interested in building the application tracker. Contact me if you just want the template.
What we’re going to be doing next is filling a tracking system like that. How?
By breaking it down, of course. Duh. 🤦♂️First, let’s get clear on what kind of jobs you want to be applying to.
Desired countries / cities.
Obviously there are some criteria as to where you want to find a job. It could be a specific city or country or region. You will do yourself a favor to be as specific as possible. Try to nail it down to the exact city. That will help you later to be more focussed on your search.
Desired company size.
I wanted to work in a start-up. You might want to work in a big corporate, or a consultancy. That’s fine, as long as you’re clear on it. Again, narrowing it down will make it only easier for you. Trust me, if you follow the framework, you will have plenty of callbacks or first interviews lined up and at that point you need to bring your A game to each of them. Don’t get distracted by opportunities you don’t actually want.
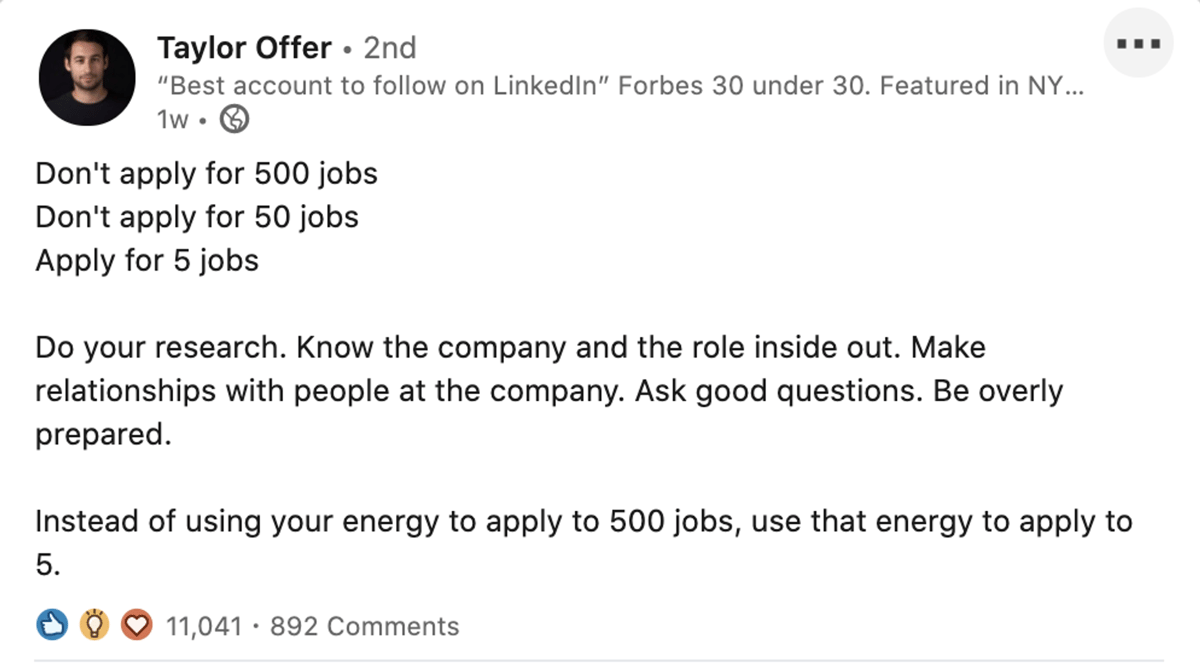
I saw this post on LinkedIn. While I tend to agree with this statement, the question is how do you make sure that you get as far as making sure you stand a chance at those 5 jobs you selected? My approach is to find 100 jobs you like and let the process drill it down for the top 5 you want.
Desired industry.
My goal was to work in a company that provides a digital product that I could see myself using in daily life - so digital consumer product. Try to find something similarly specific. What are you passionate about? Gaming, movies, automotive? That can serve as a pointer, but you also need to be realistic as to whether you have the right background.
Building the tracker.
At the end of this post I go into more detail on how you can set up your tracker to do some of the work for you automatically.
We will first build the tool. That’s an easy enough, low commitment task to get you started. Before you know it you are already in full flow to fill the list!
Basically all you need is a Google Spreadsheet (or Notion, Excel, Airtable, Coda,…) with a few simple columns:
- Company Name
- Contact Name + LinkedIn Link
- Last Update
- Job Title + URL
- Application Status
I have implemented a few more handy columns that allowed me to automatically get an overview to which countries I was applying to, what my KPIs were, and having an easy-to-copy pre-defined message to reach out to contacts.

Scroll all the way down if you’re only interested in seeing how I built this. Contact me if you just want the template.
Filling your tracker.
1. Companies
Based on your wishes we defined in the earlier steps, you should now be able to make simple Google searches. I was able to google for example “top start-ups in Malaysia”. For you, it could look like “100 top growing companies South America” or “best small consultancies Europe”. Usually you should easily find curated lists which give simple easy to scan information, such as the company sector, size, growth rate, etc… Try to focus on your hard criteria first and don’t think too much about whether you should add one of these companies to the list, just do it.
2. Contacts
Now you take use of your network. Enter the company name into LinkedIn and have a quick look whether you are somehow connected or not.

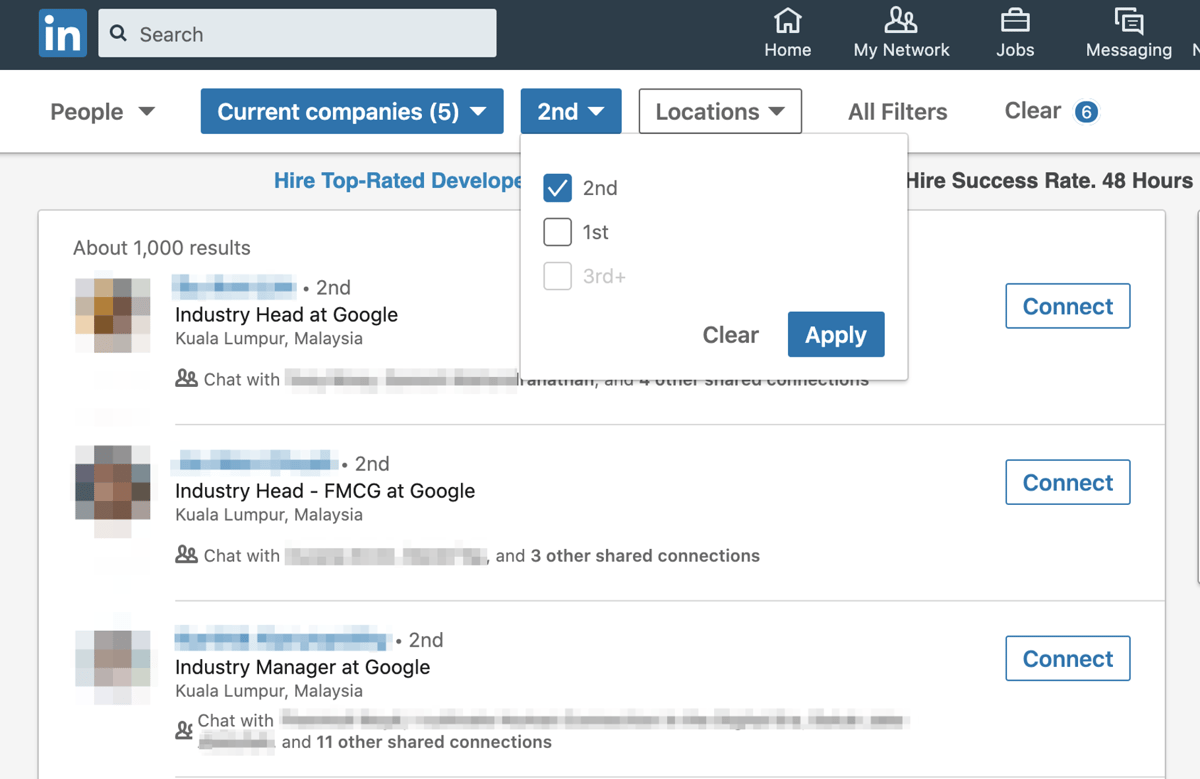
Best is if you have a 1st degree connection. Add that person’s name and link to their profile to your tracker next to the company name.
If you find 2nd degree connections (whom people you are connected with are connected), add this person to your list.
Anyone who is further away from you than that is going to be more difficult for you. They might have worked at the same company before or went to the same school. You might not have a connection at all to them, but they currently work at the company you want to apply to. You still add them to your list now, but don’t connect with them, just yet.
By now you should have a list of companies with a contact for each of them. When I was doing this, I made the mistake of keeping companies in the list even though I didn’t have a solid connection for them - because they’re prestigious and I wouldn’t want to give up on them. Obviously, when I applied I didn’t get very far. After learning from my mistakes and filtering them out, I ended up with around 120 companies in my list where I was able to find a contact for ~70% of them.
I reached out to each and every one of them via LinkedIn with a generic message along the lines of:
Hey {contact_name}! I am interested in a role in {job_title} in {city_name}. Since you work at {company_name} I wanted to ask you about the company!
Scroll all the way down if you want to know how to only interested in seeing how I built this. Contact me if you just want the template.
This allowed me to easily create a personalized message for each and every contact. I made sure I have a different template based on whether I was reaching out to a 1st degree, 2nd degree connection, or whether I was simply adding a note to an entirely new connection.
Neil Patel found personalizing messages improve results more than 100%.
Contact me if you want to know how you can fully automate this process.
In the Updated At column I would note down the date I made the contact. And this is finally where the routine would kick in. People would get back to me constantly - so in order not to get overwhelmed I would sit down 3 times a week for 20 minutes and made sure I followed up or made further progress for each company in my sheet. For those where my contact replied, I would continue the conversation and lead it to finding out more about available job opportunities or being referred to someone who has more information (and don’t forget to update the Updated At column for the last touchpoint!).
It would usually go in any one of these ways:
- They don’t have an opening for what you’re looking for at the moment. That is okay. You can ask about similar roles that would give you an opportunity to switch into your desired job later (for some companies I was considering to be customer support or data analyst first, only to then switch into product). Otherwise, you simply note down to check back with this company in a month.
- They send you a link to an opportunity (or even worse just the link to their career page) and tell you to apply. This is where you need to play hard. Under all circumstances you want to avoid being “just another application”. Ask to be connected with the hiring manager, a recruiter or someone else who can give you a positive answer whether it actually makes sense for you to apply.
- They’re willing to refer you. Perfect, you’re all set. Prepare your application.
- They’re unhelpful. Remove them from your contacts column and look for another contact at that company.
This process should take you around 20 minutes every time, but each time you shouldn’t stop until you replied to all ongoing conversations, made sure everything is somehow in motion and no next step is pending on you and that no company entry in your tracker has been left idle too long (simply sort your list by Updated At column; go even fancier by coloring columns where the last Updated At is in the past). For example, if you reached out to someone and they haven’t replied in 2 weeks, it’s time to find another contact at the company. If you applied and haven’t head after 1 month, follow up with your contact.
Step 5 - Nailing the interview process.
This part, I am afraid, asks for a different blogpost altogether. Also, the process is probably different for every industry and profession. I am considering doing one for product managers, specifically (give me a shoutout if you think I should). I will just be brief here, but I recommend you to do your own research.
What helped me is to do my homework and research. Probably someone already wrote a book (i.e. there is the brilliant *Cracking the PM Interview: How to Land a Product Manager Job in Technology* by Gayle Laakmann McDowell and Jackie Bavaro).
Some exercises I can recommend for you to prepare for each and every application:
- Prepare and practice your personal elevator pitch.
- Do the Porter’s Five Forces analysis to get a good understanding of what competitive space the company is in.
- Try describing the company using Simon Sinek’s golden circle method to understand why (the vision), how (the mission) and what (the strategy) a company does what it does.
- Fill the Behavioral Interviewing Grid to have a story ready for any kind of question the interviewer might ask
- For every position you apply, check the required experience and responsibilities you will have. Adapt your CV and change it to reflect such experiences you’ve had before. Also your CV might need to have different keywords if you apply to be a data scientist, a product manager, etc…
My final tip is: be yourself and be confident. At this point, you know exactly what kind of job you want and there are plenty other opportunities waiting for you in your tracker if the one you find yourself applying for does not pan out.
Bonus step - Building the tracker advanced edition.
This tutorial will use Google Sheets, but any other spreadsheet or advanced doc software should have similar features.
If you cannot be bothered to create it yourself, contact me to get it directly.
The tracker.
Start with a blank spreadsheet and create your columns first (Company Name, Contact Name + LinkedIn Link, Last Update, Job Title + URL, Application Status). For the Status column, set up data validation to only allow entering proper statuses. This will allow you to easily enter it in a correct way, so your dashboard can later pick up on it. Also, add conditional formatting to make it easier
readable. The statuses we are going to implement are the following:
- Open: You have not contacted anyone on LinkedIn, yet.
- Lead Contacted: You contacted or added a new LinkedIn connection.
- Meeting: You had a meeting with your LinkedIn connection.
- Referred: You got referred to apply.
- Applied: To keep track of where you already sent and wait for a follow-up from the recruiter.
- Rejected: It happens, don’t sweat it.
- 1st Interview: This is usually the recruiter interview. If you’ve been referred, you should pass this easily.
- 2nd Interview: This is for any step after the recruiter interview.
- Duplicate: You already talked to this contact or this company.
- Stop: You decided not to go ahead with this one.
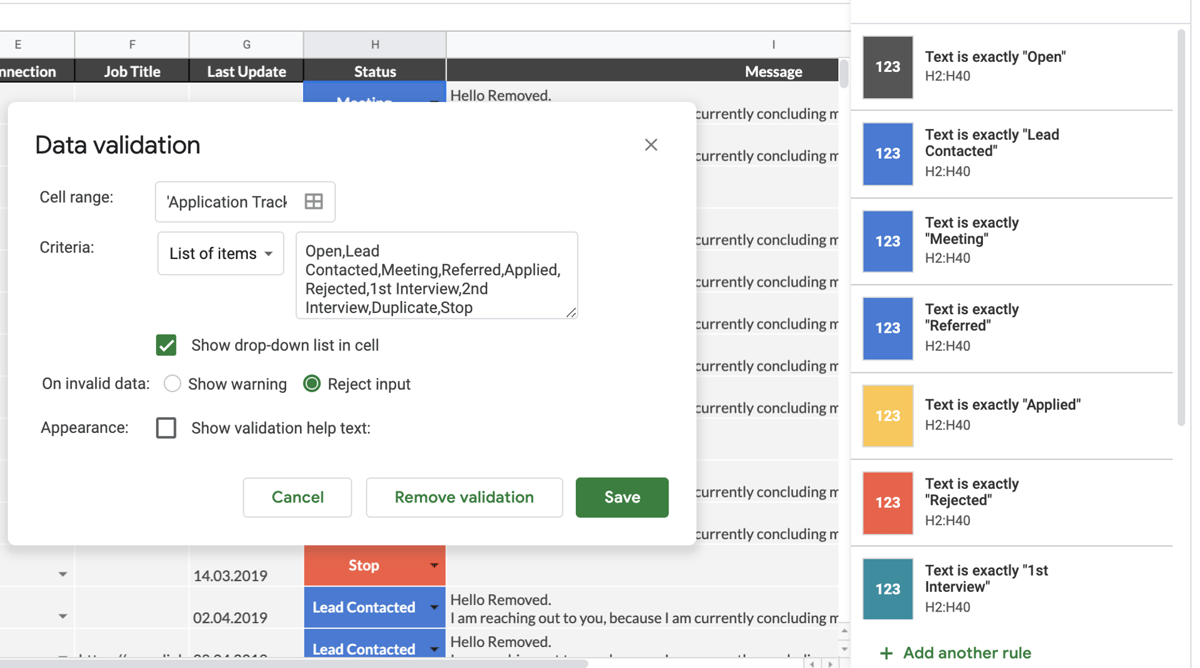
How to set conditional formatting and data validation.
Next, we’re going to implement the first column designed to make your life easier. It’s called Action Required and will tell you whether enough time has passed for you to follow up. The formula for this column simply takes the date from Last Updated At (make sure it’s formatted like a proper date) and checks whether the current date is later than 3 days from when you last followed up. Then you can simply filter your entire list whether it says TRUE or FALSE. You can also add conditional formatting to make it easier to scan for yourself.
=G2+3<today()

The final column to help you in the process is the Message column. This formula gets a tiny bit more complicated.
=IF(D2 ="", "",if(E2="1st",(CONCATENATE("Hello ",INDEX(SPLIT(D2," "),0,1),". ",Ref!B$2," ",B2," ",Ref!C$2,A2,Ref!D$2)),if(E2="2nd",(CONCATENATE("Hello ",INDEX(SPLIT(D2," "),0,1),". ",Ref!B$3,B2,Ref!C$3,A2,Ref!D$3)),if(E2="3rd",(CONCATENATE("Hello ",INDEX(SPLIT(D2," "),0,1),". ",Ref!B$4,B2,Ref!C$4))))))
Let’s break it down into its individual elements. There are multiple parts to the formula but at it’s core it’s a series of IF statements. The first part of the formula, IF(D2 =”“, “”, checks whether the column Contact Name is empty for the respective row. If it’s empty, we simply don’t display anything. Next, it checks if the Column Connection says 1st. If it’s true, then it will apply the following formula:
(CONCATENATE("Hello ",INDEX(SPLIT(D9," "),0,1),". ",Ref!B$2," ",B9," ",Ref!C$2,A9,Ref!D$2))
What it does is stringing together a lot of different fields into one message, for which we use the function CONCATENATE. Every field or part of the message we string together is separated by a ,. The first part is “Hello”, which is the beginning of our message. Then we want the First Name to be shown. Our column Contact Name, however, most likely has the first and last name. Hence, we use the function INDEX(SPLIT(D9,” “),0,1). The way it works is that it first SPLITs Contact Name by the space character. Using INDEX we then select the first result of this split. If you would want to select the second result (which most likely is the last name) you would use the function INDEX(SPLIT(D9,” “),0,2). Next, we add a . and then we reference a new tab (here called Ref). With Ref!B$2 we select the field B2 from the tab Ref, which in this case is the first part of our customized message (I am reaching out…). We continue by adding a space and then B9, which is the city, and we continue referencing either from the Application Tracker tab or from the Ref tab until we get a message that reads like this:
Hello Anisha. I am reaching out to you, because I am currently concluding my AIESEC career. After 2 years in IT on AIESEC International, I was looking for a Data / Tech / Product role in Kuala Lumpur in a Unicorn. Since you work in Fave I wanted to ask you about the company”

In this tab we note down the different parts for each customized message.
But that’s not all. Our function has two more IF statements chained together. They follow the same principle, we just account for a different message for 2nd degree or 3rd degree connections.
The dashboard.
This simply serves to give you a realtime dashboard and overview how well you are doing in your quest to your dream job.
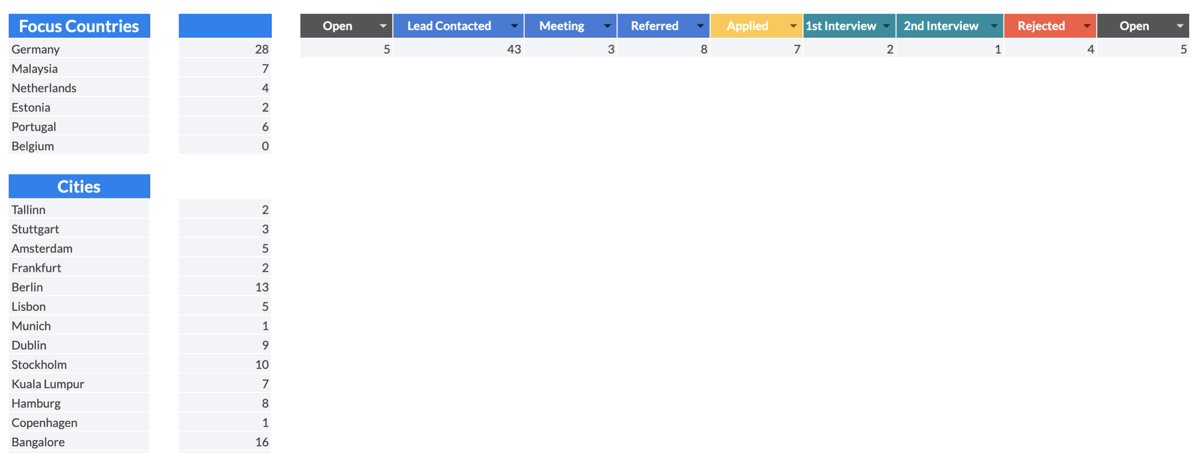
Focus Countries
You simply list down your top 5-7 countries you want to live in. If you’re looking for one country in particular, even better! You can omit that one. The formula to get the count of applications in each country is simple.
=COUNTIFS('Application Tracker'!C:C,B4)
This formula results in the number 28 next to the country Germany. All it does is to go through the column C (Country) in the Application Tracker tab looking for how often Germany is listed.
This will also help you easily evaluate if your focus countries are realistic. In my case you can see that for Belgium I found 0 jobs, so probably I should remove that from my wishlist.
Focus Cities
Whereas in Countries you typed the list by hand, Cities we will auto-populate using the following formula, which will simply take all entries from the Cities column, filters out duplicates and lists them down.
=UNIQUE('Application Tracker'!B2:B)
Using this list, we can replicate the formula for counting Countries also for Cities, giving us the desired end result. This will help you see which cities seem to provide the best ecosystem and you should probably focus your search on.
Application Status
Take the same statuses that you filled previously and put them next to each other. Using COUNTIFS we will pull the correct numbers from the Status column.
=COUNTIFS('Application Tracker'!$I:$I,F3)
That’s it. Your tracker is ready. Good luck, the rest is on you.
If you had any trouble following the tutorial, you can hit me up on LinkedIn or contact me directly via my website.


